

"In 2017, relatives offered us to live in their house on the first floor. The building is a two-quartered residential building with plastered walls. I had to understand all building terms and not only. And to save, they decided to do everything with their own hands, "Olga writes our readers and shows what happened. By this story, we open a new stage of the competition "Repair for a penny", to participate in which you can and you. Send your stories to [email protected]. Recall that the winner of each tour receives a thousand rubles from our sponsor - the shopping center "Leningrad".
With our own hands, we did a lot: the wiring of electricity, heating, put the tile on the wall, linoleum, shoved the wallpaper - and it was also the quest for the search for materials and information.
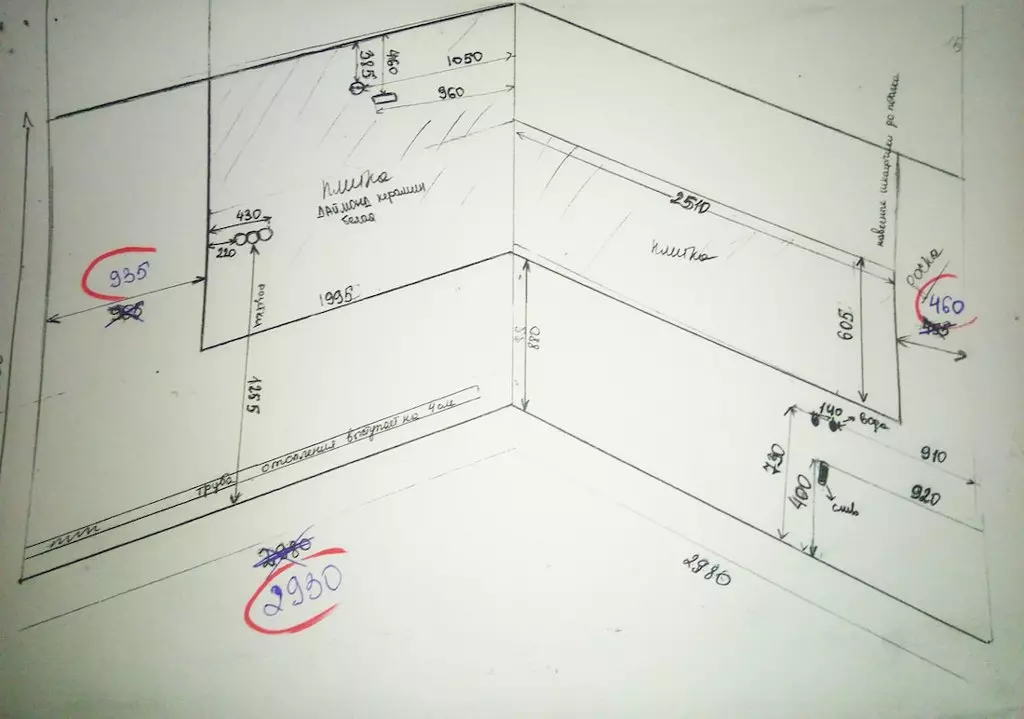
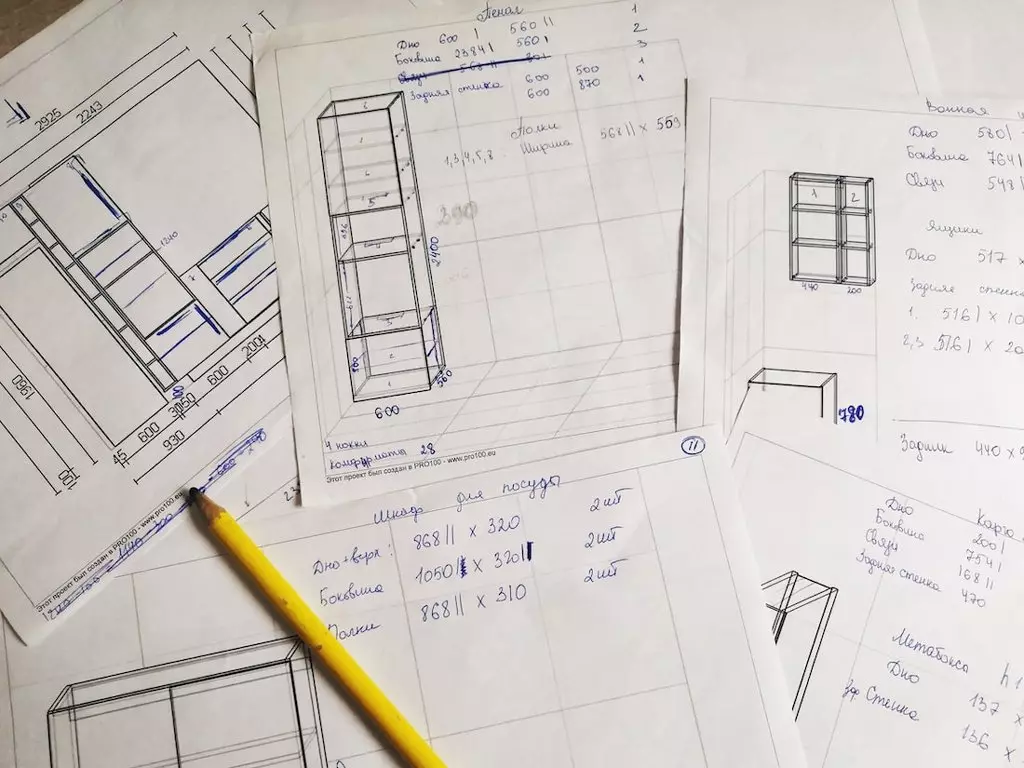
Then the kitchen premises themselves were measured schematically on the A4 sheet, describing all the nuances: outlets, windows, hood, water supply, plum, gas, altitude apron, existing sockets, refrigerator sizes and more.
We went to one of the organizations with our drawing. After sitting somewhere, the watch with a designer, sketched the kitchen project. The project consisted of lockers of the lower and upper tiers + wardrobe pencils, cargo. The estimated cost of the kitchen was $ 3000. In the hands of the project did not give, allowed only to take a picture. Another thought still flashed: "Can you do everything yourself?"
Next, we have invited another organization. The designer measured the entire room and designed the project, the cost of which was $ 2630. The third organization we dropped our project to Viber and drawing with measurements - there was already a modular kitchen worth $ 2,800.
Of course, we were inclined to a cheaper option, but in some of the days they declared someone from relatives that we would make the kitchen. And then it started! On the Internet there is a lot of information, but it is not always clear what option the calculation will be suitable for you. The head was simply filled with read, allocate the necessary information turned out to be difficult. But with something you needed to start. A lot of time spent on Pinterest to finally decide on the design of the kitchen, there are a lot of ideas there.
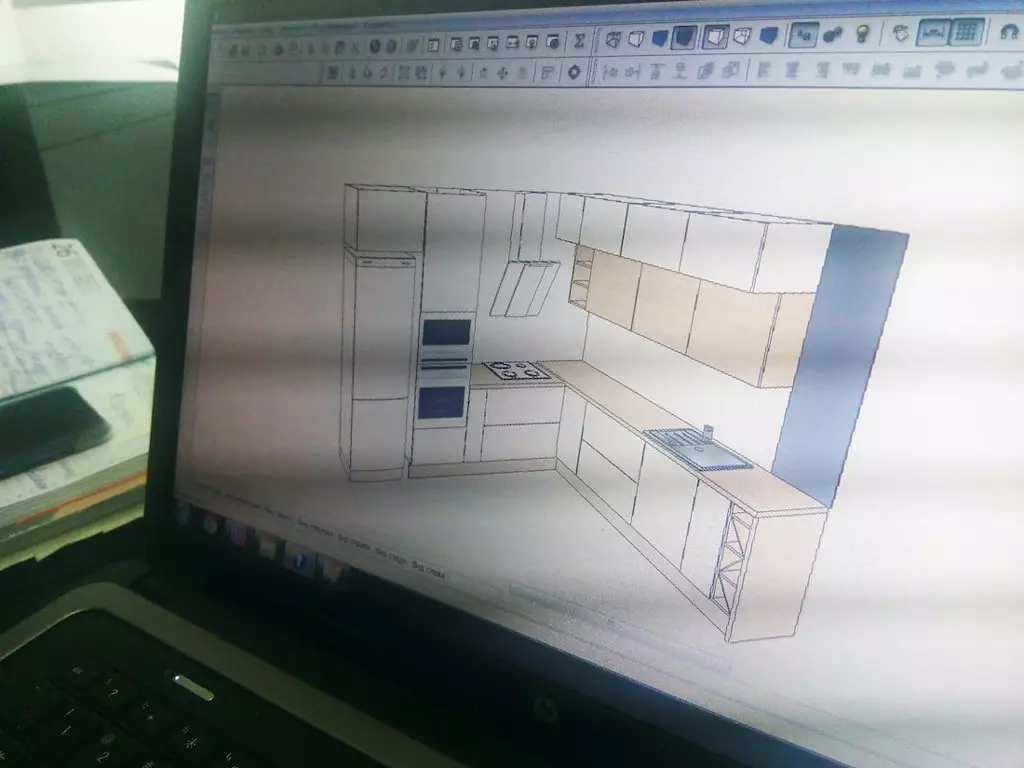
The very first: make yourself a couple of copies of drawn kitchen circuits. We take one copy and begin to think over the location location. That is, you need to determine what size the cabinets must be placed. Next, you can download the PRO100 program (do not forget to download libraries with all kinds of lockers). In it, setting the size of the room, you can sample the project, putting the lockers on the already calculated dimensions. On the Internet, you will not find the project of the desired kitchen, and the program will not help you calculate the cut, since much depends on the material, edges, height and depth of lockers.
⚠ So that immediately advice: before designing the kitchen, decide on the material and its thick, edge. We recalculated our kitchen times three.
⚠Set 2. Decide with the organization where it will be produced. Based on this, the material that is in stock will be selected.
⚠ SUPP 3. Try not to create a multi-fission in the project, since, drawing up an order for cutting, you pay for the size of the entire sheet, and it does not matter what you need only a couple of items. This nuance will raise the cost of your kitchen and will increase the amount of material residues that need to be stored somewhere.
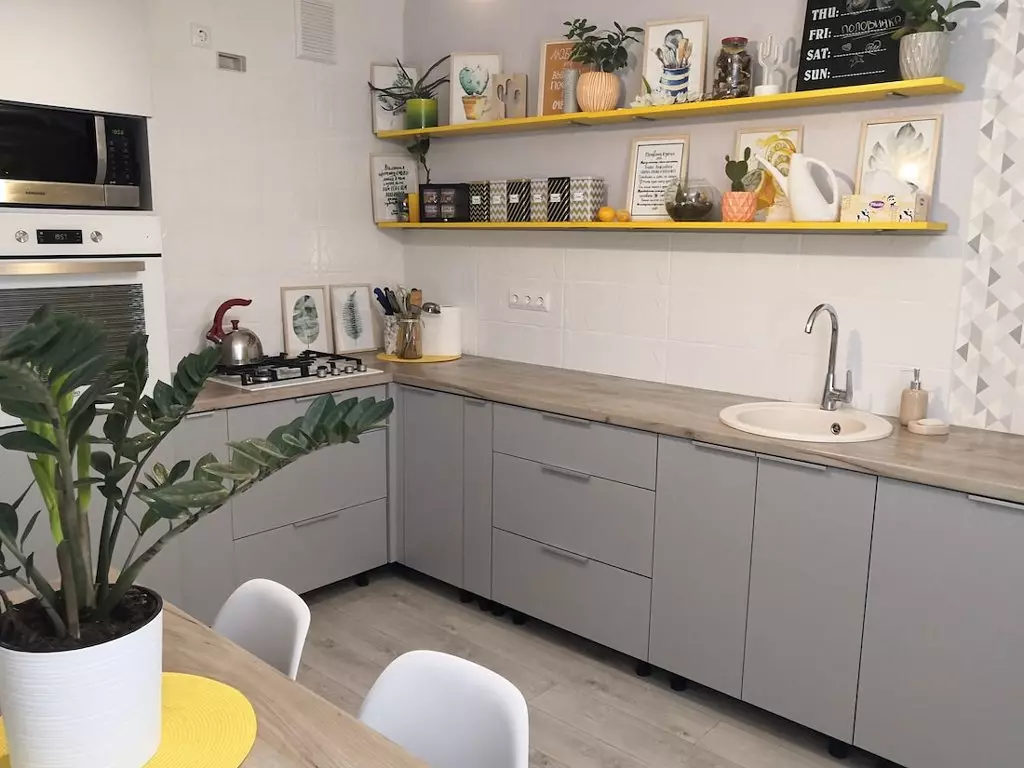
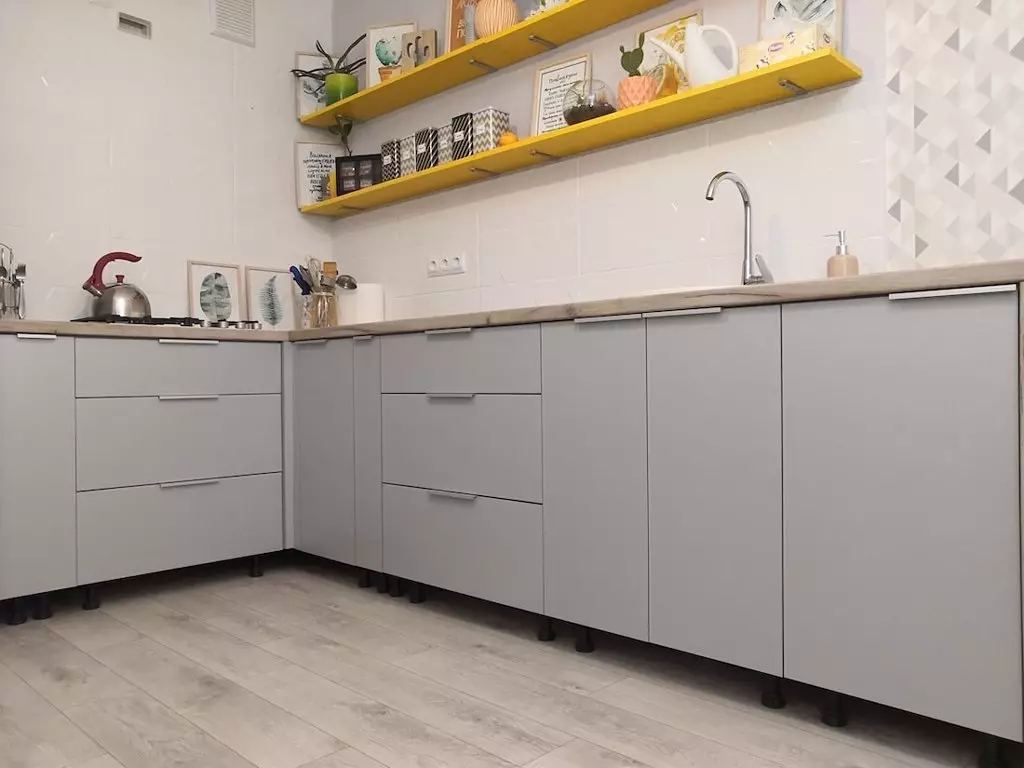
We have a kitchen out 3 × 2.2 meters. Planned cabinets with a height of 1.1 meters, lower lockers around the perimeter of the kitchen. Next, the projection of each locker is printed on A4 sheets in order to individually calculate each item.
⚠ Site 4. If you plan hinged lockers, make them to the ceiling, which will significantly increase the storage area and reduce the amount of dust. On the top shelves of lockers can put the dishes or technique that do not get so often.
⚠ Suites 5. Attached lockers are better not to make wider than 900 mm, since if you plan to accommodate drying drying for dishes, it is very difficult to find it for such large sizes. And it is not excluding, since large cabinets may not withstand the load.
Site 6. Make more drawers, they are practical and comfortable, and consider the options of the cargo for bulk mixtures and various drinks. We have two cargo: one 200 mm width for bulk mixtures, another 150 mm wide for various drinks and oils.
Immediately I will say, the path is not easy and long. We order sawing broke into three parts:
Order internal details of lockers; order table tops; Order facades.
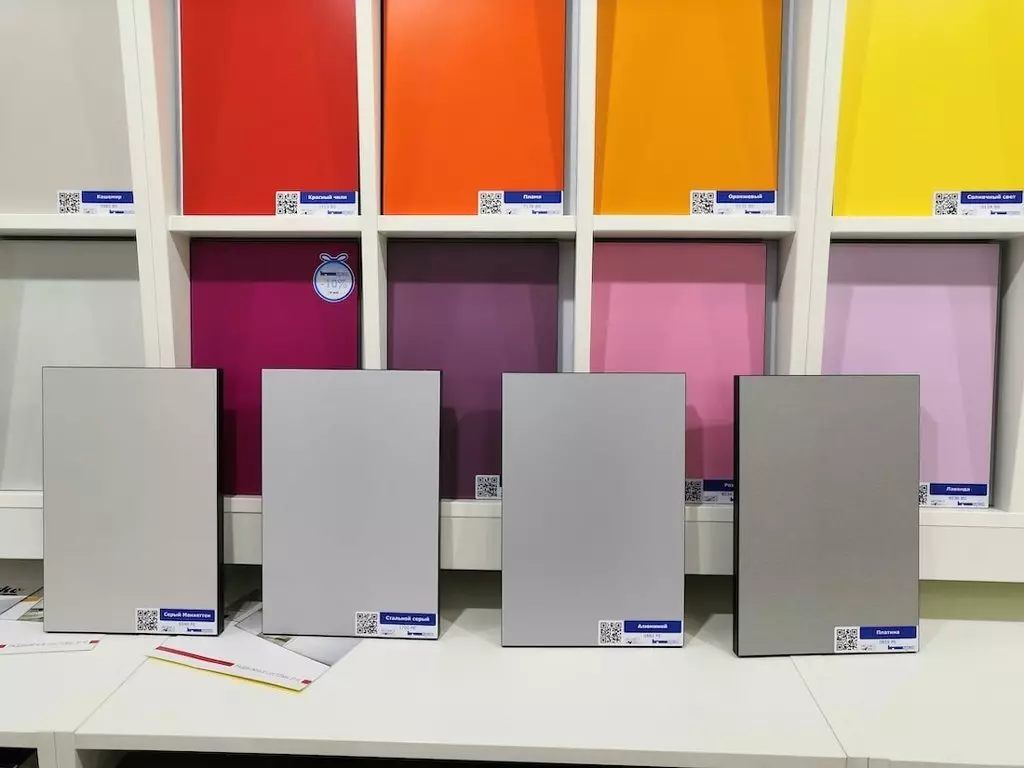
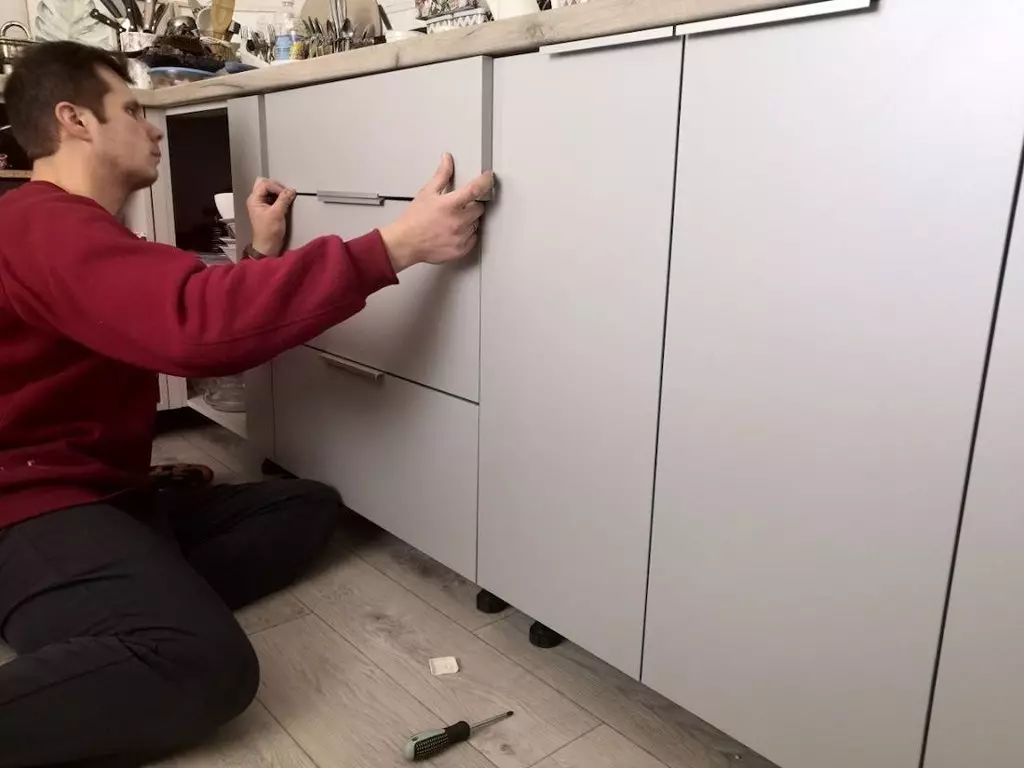
Before moving to the first stage, you should decide on the organization and materials. For cutting materials, we chose Viyar organization. For the internal parts of the cabinets, we chose the material of the cheaper: usually a chipboard of 18 mm thickness is recommended, but our choice fell on Kronospan 0112 PLOSE gray 16 mm. Next, we are determined with the tabletop: we chose Kronospan K002 FP oak kraft gray 4100 × 600 × 38 mm. Well, the facades: the budget matte version was chosen, on which the divorces are not visible, - Kronospan 0881 re aluminum 2800 × 2070 × 18 mm. The thickness of the edge for the facades is 2 mm, for internal lockers - 0.5 mm. You should also define with handles.
Case 7. For facades, choose a chipboard with a thickness of no less than 18 mm - it will be easier to make recesses for loops. Material Choose live, since what is shown in the picture online does not mean that it will look like in reality.
⚠ Site 8. Choose a tabletop with a thickness of at least 38 mm.
To order internal parts of lockers, go to the calculations. Of course, I will not describe in detail, since another article will require this. The height of our lower lockers is higher than the standard, since it wanted a kitchen under his height, and this is another plus kitchen with their own hands.
Case 9. The edge is worth glued on the parties to the parts that will be visible because the edge is very expensive.
⚠ Site 10. Purchase a loop with built-in closers: a little overpaying, get comfort. The same principle for drawers: Enough one closer on the box.
Case 11. The depth of the lower lockers should be less than the depth of the countertop: the gap between the wall and the bottom cabinets (5 cm), fade the thickness of the facade and the depth of the handles so that the handles on the facades hide under the table top. Accordingly, the depth of the lower lockers will be 10 cm less than the tabletop.
Call 12. When designing the lower lockers, see if there are retractable mechanisms for drawers for your depth.
Case 13. Sizes of niches for embedded technology, see the instructions that goes to it.
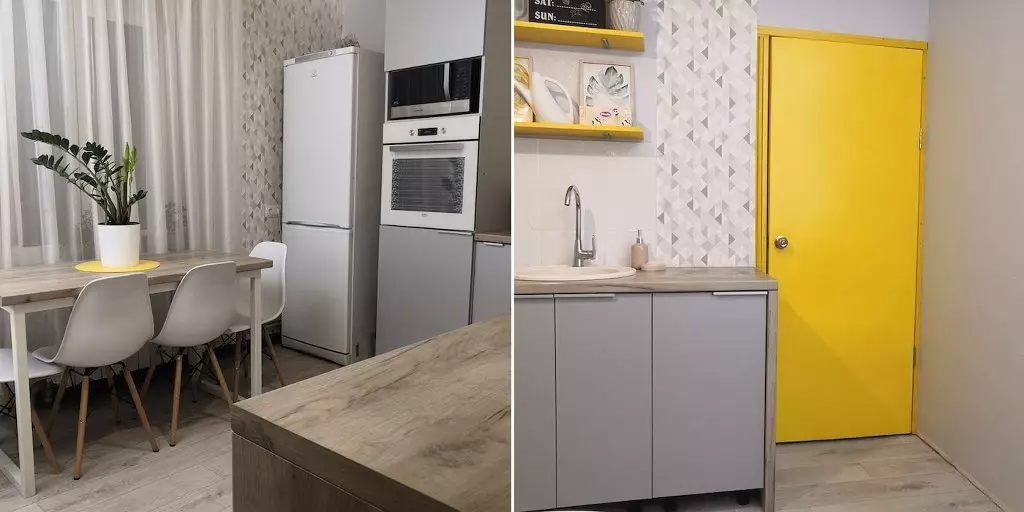
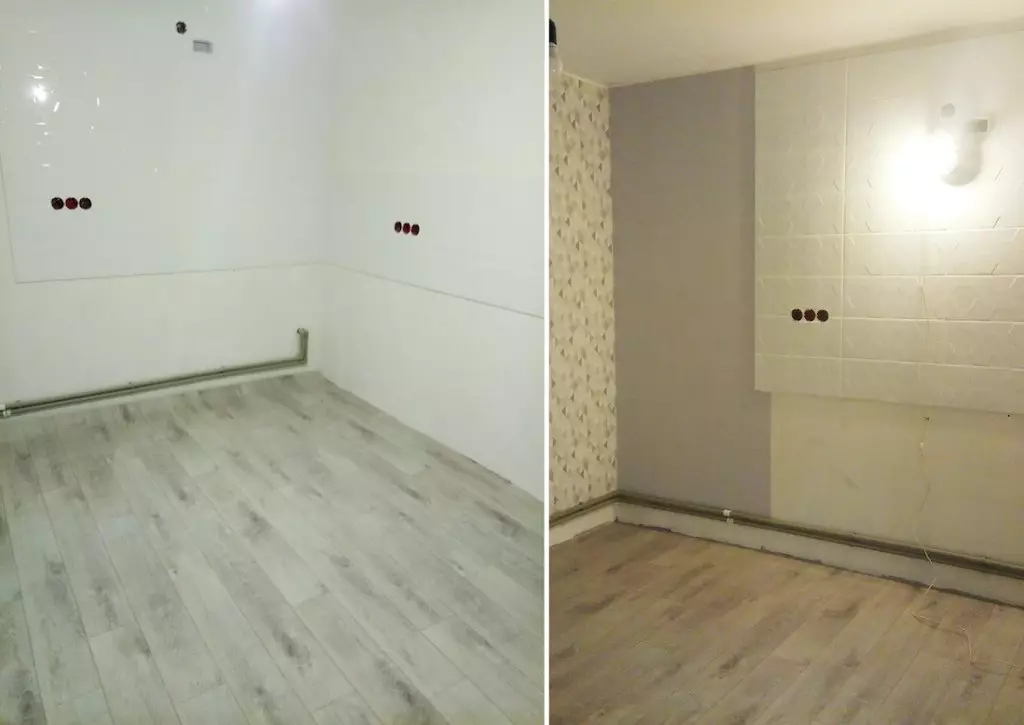
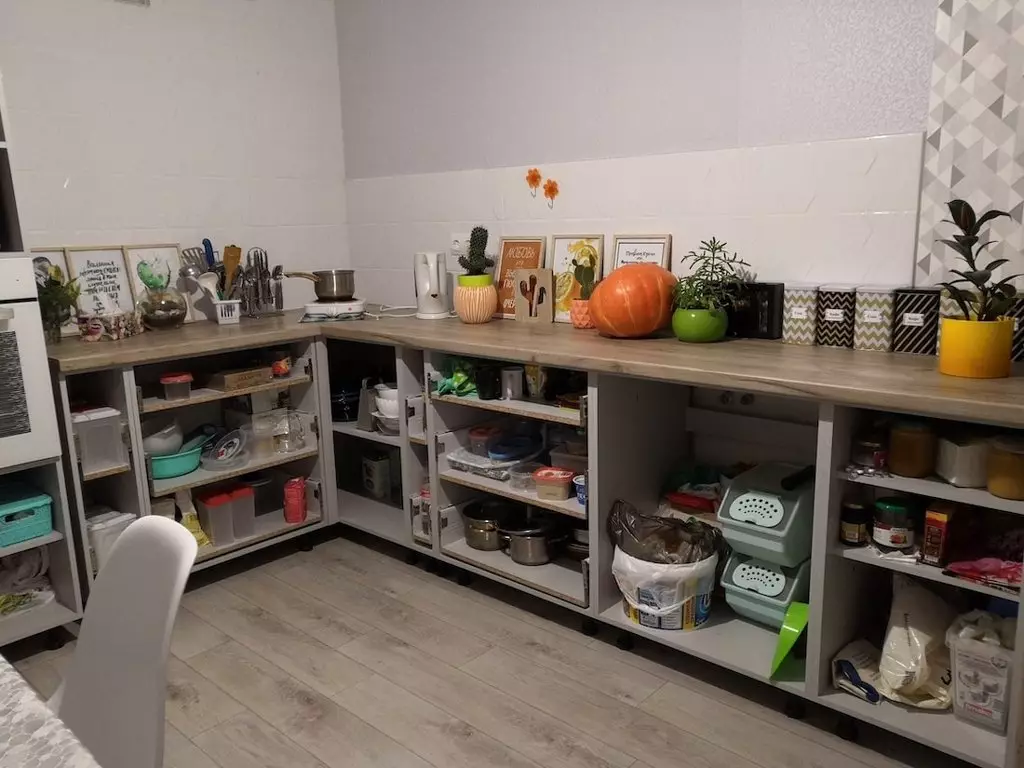
Next, following the calculations, we enter the data on the cut and give an order for processing. When you take the cut, carefully check the dimensions and edges. We did the holes for the confirmates and the screws, the screeds for connecting the lockers. For the assembly of lockers gone week. Then, putting them in the kitchen, they made measurements once again and ordered a worktop. We had such a kitchen (without facades we lived about six months).
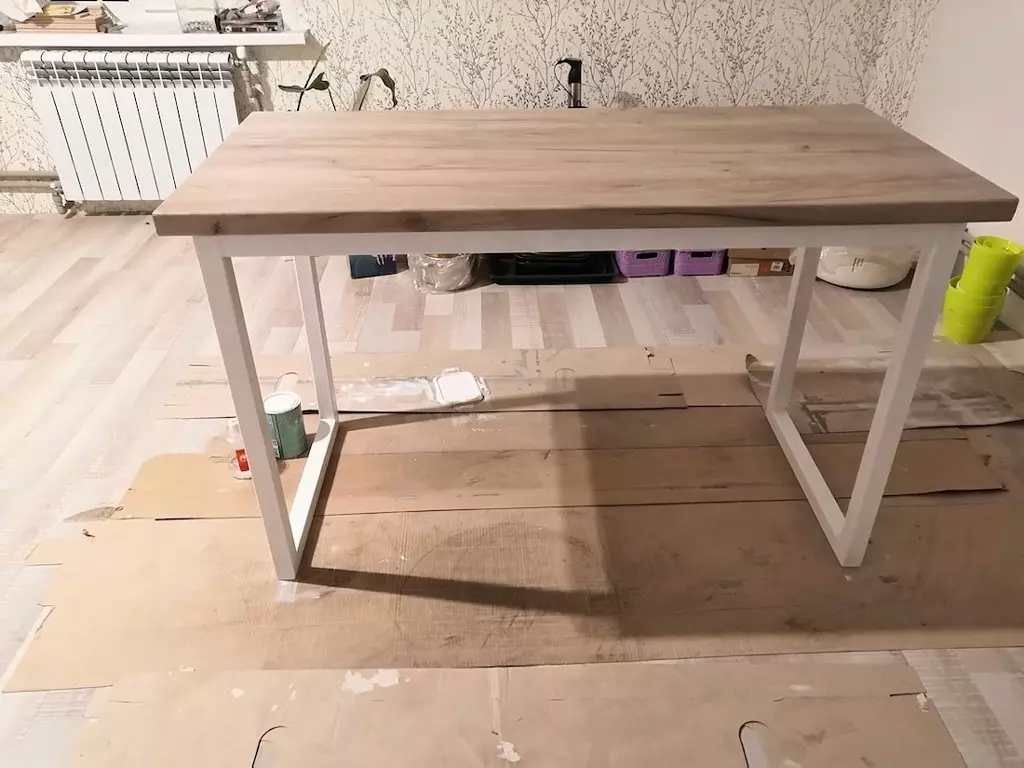
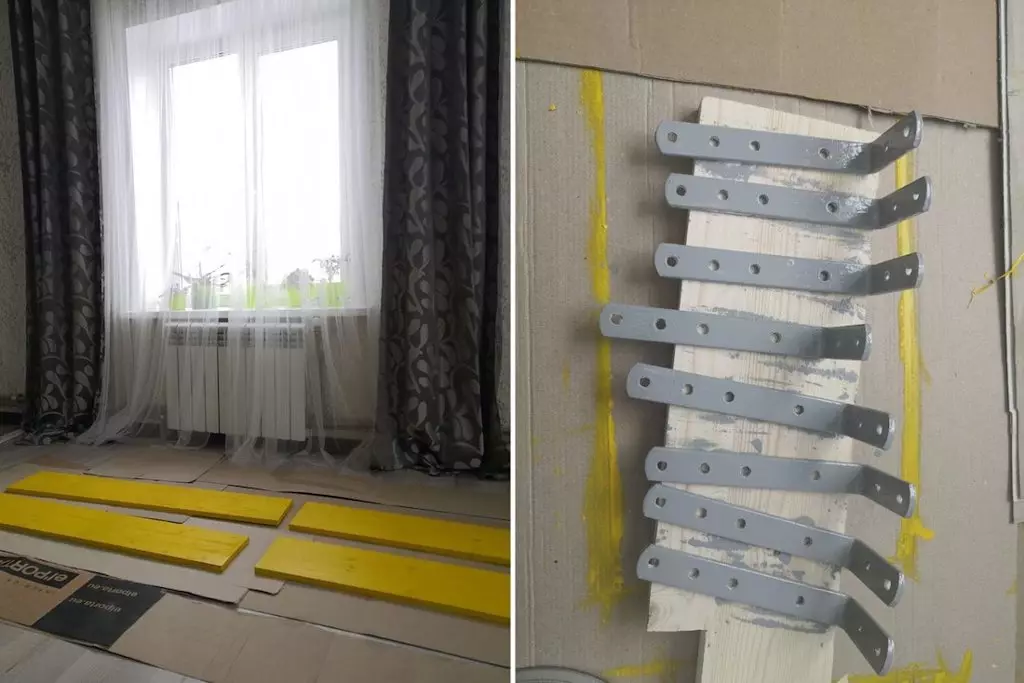
Meanwhile, we decided to do a kitchenette. I really wanted a table of profile pipes and wooden table tops. Since we have a piece of countertops from the kitchen, we decided to use it. To begin with, bought pipes 40 × 40 and 40 × 20 mm. Measured the necessary dimensions and sawed, these parts were taken to welded, after a few days the welded frame was taken, cleaned the grinding seams, the places were shaded, then primed and painted with a roller in two layers with white. About 50 rubles were spent on the table materials.
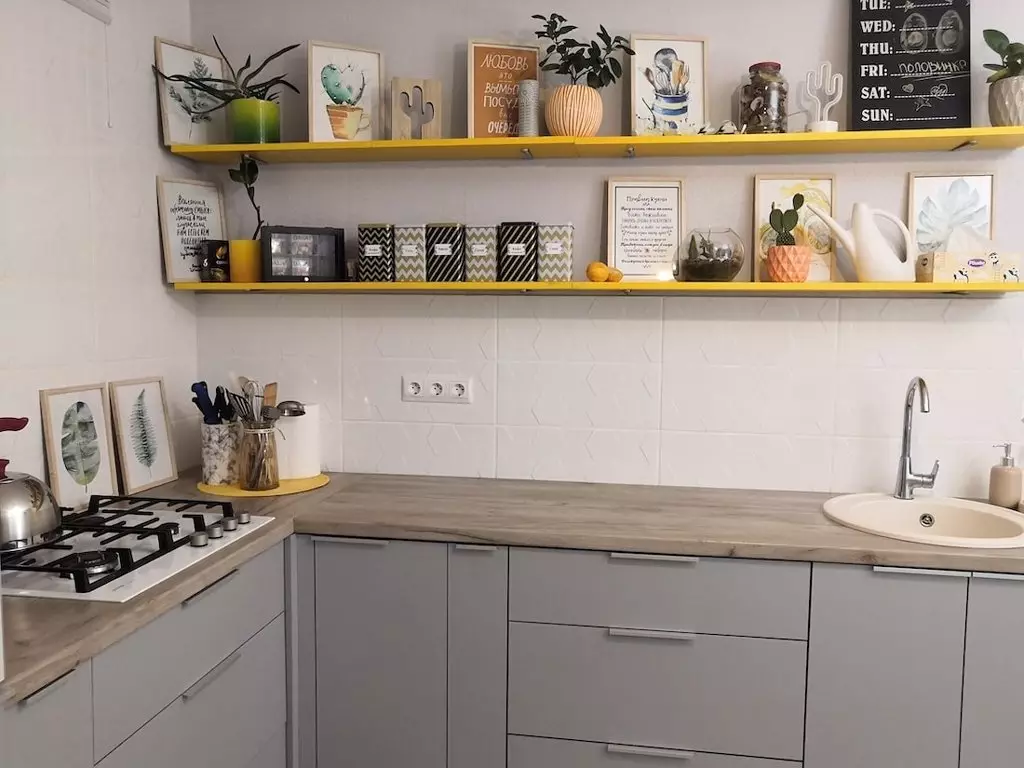
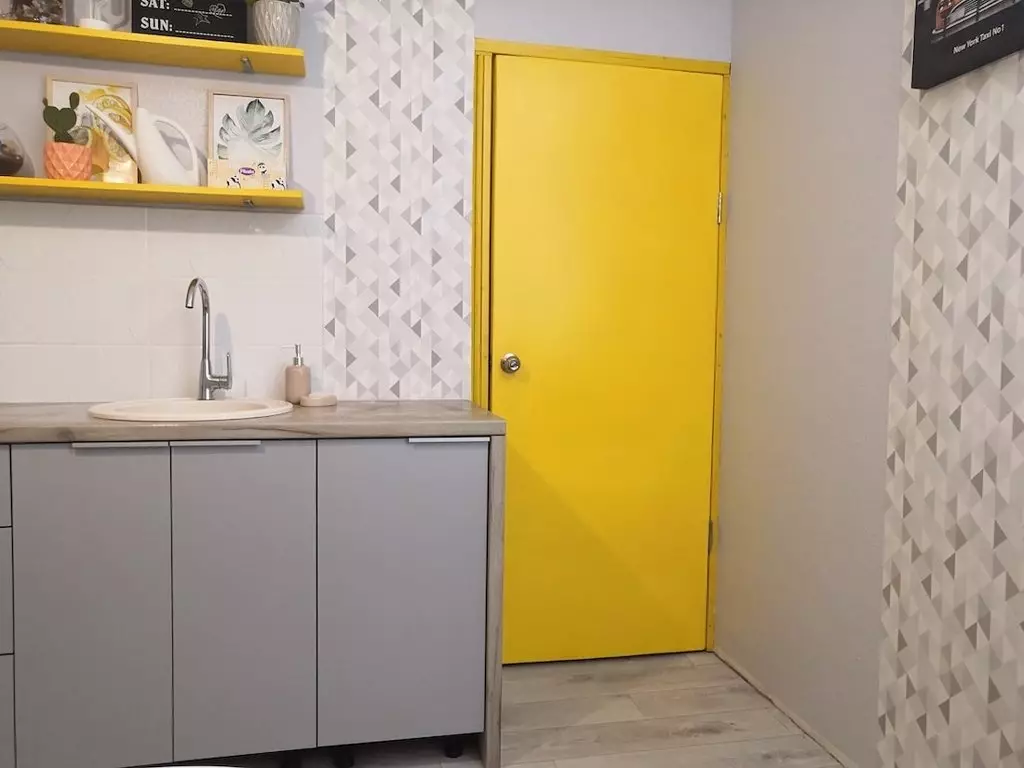
In January 2020, they decided to make the third stage of cutting - the facades of the kitchen. I had to remember everything. Cabinets were placed: what was on paper could differ from real sizes. As a result, they began to deal with gaps between facades and their size. But consider this part well, since the errors should not be here, because it will not be possible to correct, and the errors will fall into a good penny. They gave for processing order by facades, and in the meantime they decided to do open shelves - instead of mounted lockers. And yes, we remembered about the Council number 4 (reduce the amount of dust), but then the desire to need to need it.
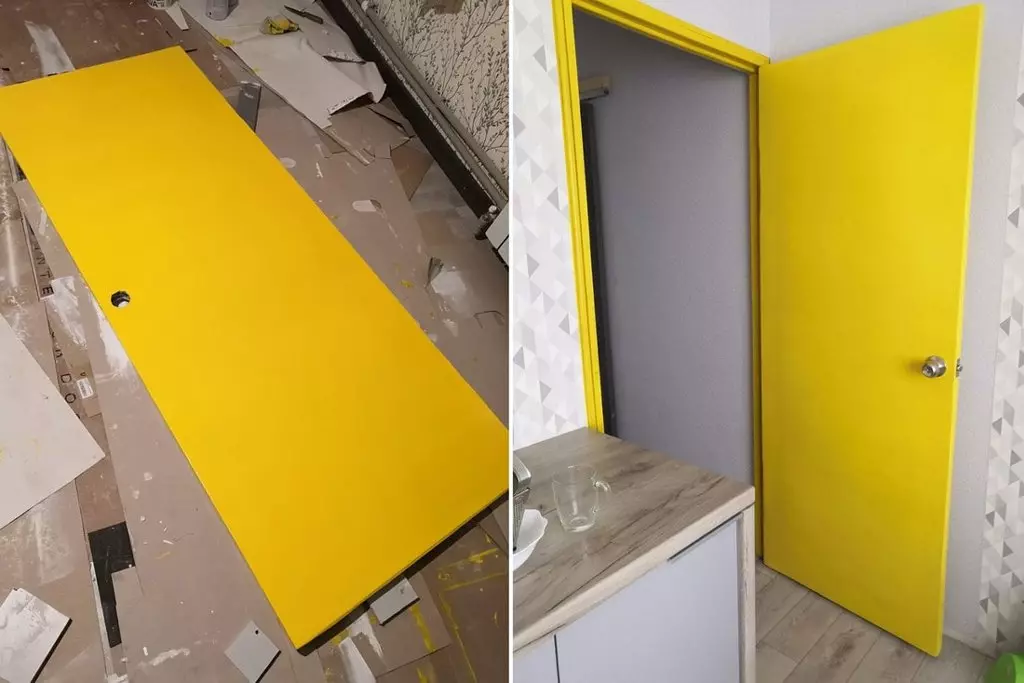
Bought a wooden shield (4 pcs.) The size of 200 × 1200 mm and a thickness of 18 mm, painted in several layers in yellow and attached to the wall to the corner. But this was not stopped. There were somehow in the "Juras" store and noticed a pleasant yellow door, it cost it then about 400 rubles. Such expenses were not included in our plans, so we decided to redo the old door, which was in stock (remained from the construction site). I had to clean it well (there was a bunch of layers of oil paint), slip out, relent again, primed, paint into white, and then in yellow. Question price: 15 rubles. on the primer (for wood), 15 rubles. on white paint (for wood matte), 20 rubles. On yellow paint (matte), 15 rubles. on putty. As a result, in the presence of the door leaf, the door cost 65 rubles. The handle on the door is also old, we just cleared it.
Let's return to facades. It was very scary to spoil them, so the process was tightened a little, and there were enough of others. Nevertheless, it was so much happiness to see the kitchen is transformed. Of course, there is a golden rule "Seven times will die, once again." In general, do not be lazy.
Nevertheless, when you make repairs in several stages, it is not that felt that is not so felt, plus in the process we ordered crook and in the bathroom. It turned out everything in one style.
Without the help of her husband, this kitchen would not work out as it is. And of course, it was not without adventure: collecting the closet penalty, we tried to put it on the legs and realized that it was higher than the height of our ceilings. I had to shorten: it turned out, in the calculations, the height of the legs were not taken away. There were other moments, but it was only us. The plans were extractoring over the cooking panel, which was bought long before the design of the kitchen, but because in the near future we have to move into our home, we decided not to do holes in the tile. Now there is enough unfinished, but it is no longer so critical.
Decide yourself, are you ready for such experiments, and do not be afraid to start repair.
White rub. Tile for apron 97.69 Linoleum 138.4 Mixer 99 Wallpaper 97.94 Washing 133 Door 65 table Kitchen (frame) 50 shelves (Furniture shield) 29,96 Shelves Paint 15 Rocks (8 pcs.) 32.56 Eaves 36.42 Countertop 185.28 Internal parts of the cabinets (chipboard, cutting, edding) 462.24 facades (chipboard, cutting, edding) 159,49 Rear wall of lockers (HDF, Cut) 29.75 Various accessories and mechanisms (Kitchen legs, Metaboxes, confirmates, closers, loops, self-tapping screws, drill for confinal) 364.15 Profile handles (profile, cutting from the profile) 40,92 Total 2036.8
Our channel in Telegram. Join now!
Is there something to tell? Write to our Telegram Bot. It is anonymously and fast
Reprinting text and photos Onliner without resolving the editors is prohibited. [email protected].